Archive | September 21, 2018

Beebeecraft Free Patterns on Making a Simple Ear Cuff with Wire in few Minutes

Summary: This article is to display you how to make a simple ear cuff with wire. Hope you will like this easy Beebeecraft jewelry making ear cuff.

图片11

Silver copper wire is the only jewelry craft supplies in making this simple ear cuff. And you don’t need to worry about any difficult techniques, because wire wrapping is the technique used in this ear cuff. Now let’s follow me to learn the detail methods from the clear ear cuff patterns.

Supplies needed in making this simple ear cuff:

0.8mm Silver Copper Wires
Round Nose Plier
Wire Cutter Plier
Jewelry making tools Flat Plier

How to make an ear cuff with wire?

Step1: cut 15cm copper wire and fold back left end at the two-thirds point, and then fold the right one at middle of the whole wire. You must be sure that the folded wires are in one flat.
TIM图片20180920144503

Step2: bend the corner with the flat plier as shown. You should know that the wide of ear cuff depends on your ear.

Step3: roll two ends toward the middle of the copper wire with the round nose plier.
TIM图片20180920144518

Done!

So your simple ear cuff is completed. I think you have learnt how to make an ear cuff from those clear patterns. Have a try and make a simple ear cuff for yourself.

Beebeecraft Tutorial on Making Hanger Earrings with Simple Wire Coiling Techniques

Summary: This tutorial shows you an interesting earring pattern – wire wrapped hanger! With simple wire coiling technique you can also make the fun earrings.

图片10

Besides getting enjoyable experience, I learned crafting techniques while devoting myself into various jewelry making projects. For example, in this wire wrapped hanger earrings tutorial, I need to know triangle wire coiling technique.

Necessities for wire wrapped hanger earrings pattern:

Pandahall Elite 1.5mm blue aluminum wire
Silvery earring hooks
Round nose plier
Flat nose plier
Wire cutter

How to make wire wrapped hanger earrings:

Step 1: Make wire wrapped hanger

1st, cut a 30cm length of aluminum wire, leave 1cm tail at one end and bend this end into 60 degrees with flat nose plier;
2nd, shape a equilateral triangle with plier;
3rd, do triangle wire coiling 3 times;
4th, bend down the other end, leave 2cm tail and loop the tail with round nose plier.
TIM图片20180920144021

Step 2: attach ear hook to finish earrings

1st, before closing the loop slide earring hook onto, and then close loop with plier;
2nd, repeat to make the other one.

Finally wire wrapped hanger earrings look like this:

Now I have finished the blue hanger earrings! This Beebeecraft tutorial is quite simple and suitable for craft novices.

Easy Beebeecraft Introduction on Making Letter Bracelet

Summary: Letter bracelets are always with some special meanings. And you can make your special bracelet with the letter beads in Beebeecraft.

图片9

In this tutorial, we are going to use acrylic alphabet beads and transparent acrylic beads to make this letter bracelet. They match so well. If you like this bracelet, I really hope you can make it with us.

4 steps to make letter bracelet:

  1. 1. Things you’ll need: cube acrylic beads, crystal glass beads, memory wire, brass beads, cross pendant, jumprings and lobster claw clasp.

    TIM图片20180920143445

  2. Cut a circle of memory wire, then slide beads onto the wire in order as picture shows and then make loop with each end of the memory wire.
  3. Add jumpring chain to one loop and then hook the cross pendant to the last jumpring.
  4. Add a lobster claw clasp to another end.

Done! I believe you have already finished the letter bracelet. It looks shining. Try to make your own bracelet. You can also replace the crystal glass beads with the glass pearl beads.

Easy Beebeecraft Introduction on Making Red Heart Drop Earrings

Summary: Red color can give people passion and always attract people’s attention. And this Beebeecraft tutorial will teach you to make red heart earrings. They are very eye-catching.

图片8

These red heart earrings are very shining. I believe you will be outstanding even in the crowd. And the making process is very easy. If you want to create your own jewelry, you can try these earrings. They will give you a surprise.

4 steps for making red heart earrings:

  1. You will need: heart glass pendant, headpin and earring hooks.
    TIM图片20180920143021
  2. Slide the heart pendant onto headpin and bend the headpin upwards.
  3. Make a loop with the end of the headpin.
  4. Hook the read heart dangle to the earring hook.

So your red heart earrings are done! They are almost suitable for all occasions. And all the jewelry craft supplies can be found on Beebeecraft. You can change the heart color as u like. I believe they can make you more gorgeous.

Beebeecraft 6 Easy Steps to Make a Black Beaded Bowknot Ring

Summary: This tutorial will teach you how to make a black beaded bowknot ring. I’m sure you won’t be baffled by this quick-to-learning ring. And this ring is very gorgeous. Do you have interest to make it?

图片7

This black beaded ring is cute with the bowknot. Do you love this black bead jewelry? I like it very much. It costs little materials and time, so it is time and money saving. You can make it in your spare time and you will get a great jewelry.

Materials in black beaded bowknot ring:

Bicone crystal glass beads
Pandahall Elite Seed beads
brass wire

How to make a black beaded bowknot ring?

Step1: Slide 5 seed beads and 4 bicone glass beads onto the wire alternately, and thread the two ends through a bicone glass bead.
TIM图片20180920114926

Step2: Slide 5 seed beads and 4 bicone beads onto one end and thread the end through the last bicone bead added in the step1.
TIM图片20180920114938

Step3: String 3 seed beads and 2 bicone beads onto the right wire alternately and thread the wire back through the beads except the last seed bead, and then thread the wire through the right first s eed bead.

Step4: Repeat the step3 with the left wire.

TIM图片20180920114952

Step5: Slide seed beads onto the left wire until you get your desired length.

Step6: Tie a knot with the two wires.

Done!

So the Beebeecraft black beaded bowknot ring is finished. It is so cute. Make more to send your friends as gifts. They will love them.

Easy Beebeecraft Tutorial on Making Long Curtain Dangle Earrings for Women

Summary: This time I would like to share you quick-to-learn tutorial about how to make long dangle earrings. Here is a chance that you can make special gifts for your dear mothers

图片6

This pair of long dangle earrings looks like curtains with the dangling brass jewelry making chains and beads. You will be very noble and gorgeous when you wear them. Make it for Mohters’ Day gift.

Materials in long dangle earrings for women:

Brass chain
Acrylic beads
Pandahall Elite Headpin
Eyepin
Earring hook
Brass beads
TIM图片20180920114341

How to make long dangle earrings for women?

Step1: Make beaded dangles

1st, slide bead onto the headpin and male a loop over the bead;
2nd, add different lengths of brass chains to the loops.
TIM图片20180920114355

Step2: Make the curtain dangles

1st, slide brass beads and beaded dangles onto the eyepin alternately;
2nd, make a loop over the brass bead.
TIM图片20180920114408

Step3: Finish the long curtain dangle earrings

1st, prepare two same length of brass chains and a bead dangle;
2nd, add the brass chains to the loops of the eyepin in the step2 and hook them together with the bead dangle;
3rd, hook the long curtain dangle to the earring hook.

Done!

So the long dangle earrings for women are finished. I believe they can give you a big surprise. And you can make it with other beads you like. It is such a fun thing that you can make your own jewelry.

Easy Beebeecraft Tutorial on Making Red Bead Mobile Chain

Summary: Mobile chain can make your phone more eye-catching. In this Beebeecraft tutorial, we would like to teach you how to make red bead mobile chain. The finished project is very stunning.

图片5

You may spend money buying mobile phone accessories to decorate you mobile. Now I want to tell you that you can make it by your own. And it won’t cost you much time or money. So make this red bead mobile chain with us.

5 steps to make red bead mobile chain:

  1. Things you’ll need: bicone crystal glass bead, glass pendant, headpin, jumpring, brass chain and mobile phone strap.
    TIM图片20180920113604
  2. Connect three jumprings one by one and add a jewelry makingchainto the last jumpring, and then hook the red glass pendant to the brass chain.
    TIM图片20180920113626
  3. Make red bead dangles. Slide glass bead onto headpin and make a loop over the bead to get simple loop.
  4. Hook the red bead dangles to the three jumprings.
  5. Connect the top jumpring to the mobile phone strap.

So the red bead mobile chain is finished. Hope you can use it to decorate your mobile phone.

Easy Beebeecraft Instruction on Making a Stretch Bracelet with Glass Teardrop Beads

Summary: This is a step-by-step Beebeecraft tutorial on how to make a super easy glass bead bracelet. All things needed are a strand of glass teardrop beads and inches of clear elastic cord.

图片4

Making stretch bracelet is one of the best to explore your creativity in jewelry making. You just need simple jewelry craft supplies and simply by getting a strand of clear elastic beads, then arrange the beads in according to your personal preference, and you’ll make the bracelet in less than 20 minutes! The following is how I make my stretch glass bead bracelet!

Supplies needed in making the glass bead bracelet:

Electroplate crystal Glass Beads
Elastic Cord
Scissors

How to make the stretch glass bead bracelet?

Step 1: Cut a 25cm piece of elastic cord.

Step 2: Slide the glass teardrop beads one by one.
TIM图片20180920112600

Step 3: Adjust the positions of each bead.
TIM图片20180920112615

Step 4: Tie a firm surgeon knot and then remove any excess parts if necessary.

Done!

As a beginner, you’ll be more confident after trying this stretch bead bracelet. Whereas, as a skilled jewelry crafter, making such an easy glass bead bracelet might be another brand new challenge. Just enjoy yourself!

Beebeecraft DIY Project on Making an Adorable Ribbon Bracelet for Friends

Summary: To make a braided ribbon bracelet you’ll need only 1 ribbon and a few minutes. With the different ribbon you choose, you can make a large amount of beautiful ribbon wristbands as quick as you can.

图片3

Divide one wide ribbon into three parts, then braid them together and you’ll get a ribbon wristband within 1 minute. Besides, you can turn any of your favorite beads into dangles for making unique braided ribbon bracelets. Here we go!

Supplies needed for making the braided ribbon bracelet:

Benecreat Wide Satin Ribbon
Faceted Round Glass Bead
Metal Pendant
Bead Caps
Jump ring
Headpin
Lobster Claw Clasp
0.8mm Copper Wire
Scissors
Wire Cutter Pliers
Side Cutting Pliers
Round Nose Pliers

How to start the braided ribbon bracelet?

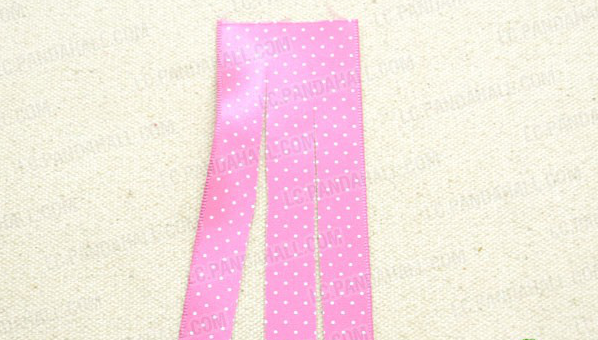
Step 1: Divide the ribbon into three equal strips.
TIM图片20180920111501

Step 2: Braid them into a common 3-strand plait.
TIM图片20180920111512

Step 3: Tie an overhand knot with one strand when get a comfortable bracelet length.

Step 4: Trim off the excess ribbons. Make two cord ends by using the 0.8mm brass wire.

Step 5: Make a decorative dangle with headpin, glass bead and bead cap.

Step 6: Open a jumpring, attach the clasp, beaded dangle and selected pendant on one end of the bracelet. Close the jumpring.

Step 7: Connect the other jumpring on clasp with other end of bracelet.

Done!

What makes these braided ribbon bracelets amazing is how diversified they are. Besides, you can extra diy a bevy of bracelets with ribbon and pearl from Beebeecraft or a hardware element. Just make and stack!

Beebeecraft Guide on Making Twisted Wire Earrings Using Easy Wire Wrapping Technique

Summary: This project will guide you to make pair of twisted wire earrings with super easy wire wrapping technique! In 10 minutes, everything around can be a stunning jewelry accessory!

图片2

Wire earrings are essential pieces of jewelry. Besides, making wire earrings is one of the most appreciate way to own newly trendy pieces with limited budget. Here, I will show you how to make an easy twisted wire earrings step by step with Pandahall Elite beads, wire and jewelry making tools. Only 10 minutes are required!

Supplies needed for making wire earrings:

0.8mm Copper Wire
Crystal Glass Beads
Headpins
Jumprings
Earring Hooks
Side Cutting Pliers
Wire Cutter Pliers
Round Nose Pliers
Bead Reamer (optional)

Instructions on how to make the twisted wire earrings:

Step 1: Make three loops at one end of wire against the bottom of round nose plier.
TIM图片20180920110735

Step 2: Twist 3~4cm part above by using a bead reamer or something else.
TIM图片20180920110745

Step 3: Trim off the excess wire and make a simple loop on the other end.

Step 4: Make 6 dangles out of crystal beads and headpins.
TIM图片20180920110802

Step 5: Attach the dangles onto the three loops respectively.

Step 6: Add the earring hook.

Step 7: Make the other piece of the crystal dangle earrings.

Done!

Once you get the hang of it, you can use this technique to create a variety of patterns as you can. Hope you will like this demonstration of how to make twisted wire earrings!